In case anyone is following this post...today i found the "Clunking" sound on her first ride up and down the street. The spare tire retaining frame, located underneath the stake bed, is loose and hanging freely since there is n spare tire present. So this frame swings forward and backwards hitting the chassie frame. This was an easy fix. I removed it until I pick up a spare.
Recent Update for this past week. I created a jig, placed the jig in my workbench vice and bent the brake bands heal and toe areas of the bands to be more consistent with the diameter of the wheel drums. Then I sent out both the rear brake bands and the front brake shoes for re-lining. They are due in this week.
Making progress. Good job.
7046 old site posts
Save a life, adopt a senior shelter pet
1938 Master Business Coupe
1953 210 Sedan
@junky Just a little "heads up". If you desire or are expecting an immediate stop when you apply the brake pedal, and since you have already removed the spare tire carrier, I would continue shopping for the previously mentioned boat anchor.
That being said, My 1935 Chevy Standard Series Coupe stops very well with mechanical brakes. I replaced the linings about 3 years ago and adjusted by following the instructions in the Chevy Shop Manual.
Mike
Many Miles of Happy Motoring
3469 Posts on Old VCCA Chat
Today's update. My recent posting of my concerns of what should be my expectation of stopping (braking issue) lead me to remove the front brake shoes and the rear bands for evaluation. Yes, I had made the brake adjustments to their max and still had to use the emergency brake to stop my truck. That's what caused my concerns. The brake linings were seriously worn and needed replacement (brass rivets seriously worn down – drums look fine, no scores or high polished surfaces).
I googled searched for brake specialist for my relining need and found Palmer Spring of Providence RI (401-351-8300), by word of mouth from a friend, a local company specializing in not only relining my shoes and bands, but they specialize in Brake Systems (including turning of drums, etc), Front End Components, and Suspensions not only for today's vehicles but for custom and vintage vehicles. They have been in business for over 100 years. AND their prices are very reasonable. Thank you Palmer!
While I was waiting for the linings to be installed I started on adding the “Signal Lights Accessory System”. Yeah, most will remind me that this system is not original to the 29 Truck, but I live in an area of the country where many drivers on the road not only are poor drivers but they have no license, registration or insurance. Sooner or later, one of these individuals would plow into my rear end, due to only one brake light, and then sue me for negligence. In my area, they would win.
I'm still not on the road yet. Shooting for May 1st. Now, on to completing my brake and signal light work! Further update will follow.
Its May 9th and after 4 visits to my local Registry my 1929 Chevrolet Truck is now registered. This issue was due to the Truck not having been registered and titled. Finally it came down to the 4th visit which required a fully detailed story as to where the seller had purchased the truck, what he was doing with the truck over time and as to why he did not register and title the truck. The Registry also wanted a certified copy of his death certificate. Yes, the original owner had passed away and I purchased this truck by way of an Estate Sale Auction to which my local Registry did not recognize that sale process. Finally that process is completed.
The brake linings are a bit thicker than the original manufacturer design. I brought the brake shoe adjustment back to the original setting, as far as I could go, in order to install the drums. With a rubber mallet, the drums went on with little effort. At this time, the linings are "engaged" with the drums. I will take the truck for a few short rides to wear the linings from being engaged at all times. The rear brake band linings, same thickness as the front, installed with little effort. The rear brake bands adjusted normally, unlike the front installation issue.
I finished installing the four signal lights (6 volt). Unlike many post, out there, my truck is a 6 volt with a negative ground (the negative cable is grounded to the transmission housing - the positive cable is connected to the starter).
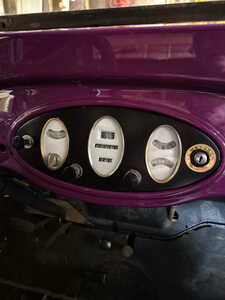
While I was installing the signal light wiring, and I previously rewired the incorrect wiring, I noticed the three instrument panel gauges were quite dirty. So, I disassembled all three, cleaned the glass and cleaned the face plates (look like new now) and I snagged the ammeter needle and now the ammeter does not work. I should have been more careful when I cleaned that unit. AND, the thermostat gauge never worked anyway. No instrument needle was present. For the time being, I have ordered both a 2 inch dia gauge of the t-stat and the ammeter and will install to the bottom edge of the dash panel. Next winter, I will address those original dash gauges and see if they can be repaired(???).
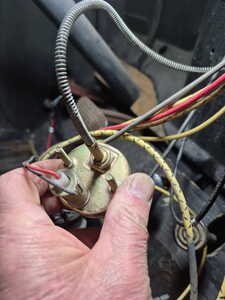
In the meantime, off eBay, I picked up a genuine Chevrolet box part number 354903 t-stat gauge (gauge face pat pending number 1621396). I figure I will have to take the gauge apart to replace this gauge face unit. See the two pics below to help you understand this replacement. As to the ammeter, I will search for the same replacement format for my winter repair of these two units. Bare in mind, this truck is an original 1929 and the old gauges were horrible looking. Once I cleaned them and put the panel back in place, this instrument panel looks great! Anyone notice that panel?
My next steps is to create and install the door glass panels, channels, etc. The window regulators are present , but the past owner never completed the window assemblies. The doors are not aligned correctly for complete closure. While closed, one sticks out about a 1/4 inch and the other is out about 5/8 inch. this looks like woodwork requirement in the door jams. My hobby is woodworking too. The windshield wiper needs some sort of rubber sleeve to install into the windshield frame. And the windshield closing hardware and the bottom weather strip are missing. Both of these repairs will be cumbersome. In the meantime, I will focus on the doors.
Any input is greatly appreciated. Here's those pics.
Hello Junky,
I am not sure you have looked at any of the archives from the G & D but a fellow wrote a 2 segment article on rebuilding the electric heat gauge, and sending unit.
I have 3 '29s, so if I can help with some guidance let me know. None of them are trucks but I recently helped a fellow member with his fathers '29 ton and a half truck.
Art
@arthur-p-sell Thanks Arthur. I will soon take you up on that offer of guidence for the repair/rebuild of my heating unit. Presently I'm working on replacing my oil pan gasket and my carburetor is out for repair also. And while all this is going on, I'm installing the drain and electrical needs for a new washer and dryer for a family member. Once all those items are complete, I'll PM you. Thanks again!
P.S. Along with all of those items I almost forgot about my tinkering with the steering. I have about 5-1/2 inches of play in my steering. That's another concern. When I get to the steering and the heating gauge rebuild, I break from this post and start a new post of those issues. G


