Already did a rundown of "things I've done so far" in the intro general discussion. Still waiting for the engine sheetmetal and intake/exhaust. I originally said they were getting a porcelain coating but it was actually ceramic. They're supposedly going to be done early next week. Guess we'll see.
To anyone who actually has sat in a 37/38 Chevy, he/or she will surely tell you that the seating area is tight to say the least. So... after making the rack for the bucket seats AND fitting the seats in as far back as I can scrunch them, I'm coming to the realization that I'm going to have to trim the rear wood that's directly behind the seats. I hate too, but if I do it gracefully maybe it won't look too terribly hacked on. I'm thinking maybe trim it like the way an early corvette looks. Rounded to fit the bucket then leathered to clean it all up.
If you don't already know, the wood behind the seats has a vertical plate from side to side that extends up from the floor about 6-8". Then a second piece slopes from there toward the rear and tucks up under the horizontal plate that sets under the rear windows and holds all the roofing material in place. The horizontal plate sticks forward past the sloping plate previously mentioned and hangs over (forward) about 2". And it's that 2" hangover that's keeping the seats from reclining enough to reduce the Parade Rest positioning when it's slid fully back. And for those of us above 6' tall, fully back is a necessity. And this trim might be just enough to get a more tolerable recline. I'm thinking use an angled jigsaw and cut just around the shape of the seats. And yes I really really hate to cut on the woodwork but damn... did I mention TIGHT? My other option is to open the cab completely to the trunk area. It's not like this hasn't been done in many a modern car. In fact it might be kinda nice to have access to whatever you have placed just behind the seat and in arms reach. But that brings us back to not wanting to hack and cut if we can help it. So this is my next venture, aside from putting the engine and components all back together when everything EVENTUALLY comes in. I'll post pictures.
Oh, and Merry Christmas everyone. It's just around the corner. And it's Cars and Coffee for me in the morning. Bright and way too early. Cheers
My 38 has plenty of leg and head room once I'm in. Getting my size 16s through the small gap between the A pillar and seat can be a chore. Width wise it's a bit tight but people weren't my size in 1938 (6'4" & north of 300lbs.). The vertical plate you mention is the front of the gas tank box so that will be a chore to move, most likely requiring relocating the tank. I don't recall much of an overhang at the top but it's been a while since I've messed with that area.
7046 old site posts
Save a life, adopt a senior shelter pet
There are many good people. If you can't find one, be one.
1938 Master Business Coupe
1953 210 Sedan
Yes the vertical plate lays right up against the front of the tank. And in fact the forward part of the trunk floor covers the tank and butts nicely to the top of that vertical plate. And again I really hope it doesn't come to this but removing the slanted plate that connects to the top horizontal would expose a reasonably clean transition from behind the seat into the trunk area. I'm still toying with what exactly to do. There's no going back once I start cutting so it'll be me kicking and screaming to make myself actually pull the sawzall trigger.
As a non vertically or horizontally challenged individual who has plenty of room in my 38 with the stock seat, my recommendation is to use the original seat. When I go to shows there are any number of 38 Chevys there. All of them but one has been hotrodded or restomodded. Guess which one consistently draws the crowd? With the exception of colors, all the rest are the same with small block V8s tied to modern running gear and bucket seats. The only 38 that approaches the way it was "born" is the one belonging to the fat kid. I even let the kids sit in it and honk the horn. The only "room" issue is the narrow gap between the A pillar and seat. That's easily solved by turning my foot sideways when entering or exiting. Keep the stock seat and any need for moving, or removing the trunk divider is gone.
7046 old site posts
Save a life, adopt a senior shelter pet
There are many good people. If you can't find one, be one.
1938 Master Business Coupe
1953 210 Sedan
And now we know how you got the name "Tiny".
Which begs the question, why don't little guys ever get nicknames like "Mondo" or "Large" or "4x"?
Just an observation.
Cheers
Dean "Rustoholic" Meltz
San Leandro, CA
3511 posts on vccachat.org
Lurch -1927 LM one ton truck - tinyurl.com/Lurch-VCCACHAT-Gallery
Justin - 1928 AB Canopy Express (1/2 ton truck) - tinyurl.com/Justin-Stovebolt-Gallery
Dean, I'm embarrassed FOR ya. 😆
And are you sure that's not a Fraggel Rock character?
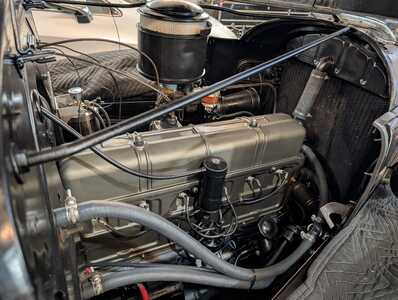
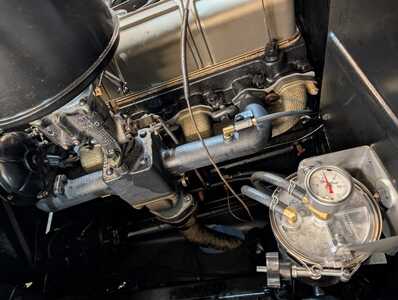
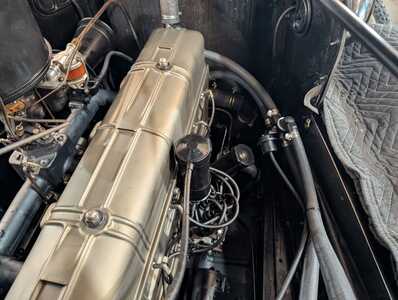
Ok so today is the day. Got all the engine sheet metal back on. Dropped the distributor in, hopefully it's back where it came from. Starter is back in place with new battery and ignition cables. All the radiator hoses are new with all new shiny clamps. I bought a vacuum heater hose valve. That'll go between the water pump and heater radiator. I decided on a vacuum type because it's still running 6v so an electric wouldn't work. The vacuum is pulled off the intake port that was previously designated for the wipers. Guess it's safe to say I won't be driving in the rain any time soon. I'll most likely install an electric wiper kit once (if ever) I convert to 12v. Anyway, I now have a shutoff there at the intake so when it's going to be cold (like all winter long) I'll just flip the valve and hot water will flow. My Buick is already converted and the heater shutoff (with a 12v reostat on the dash) between pump and heater works great. This'll just be a little less convenient.
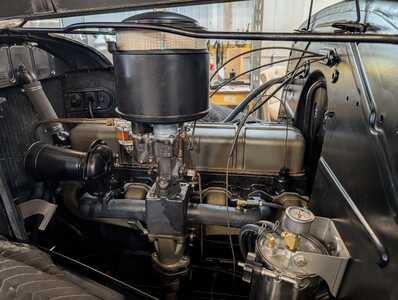
So what else? The oil is in and everything pumped nicely to the top. All the rocker arms are getting oil. I did the brake cleaner trick down the rocker oiler holes to open things up properly. After that all worked well. The Frantz oil filter is on the firewall and seems to be working. I installed a nice little pressure gauge on top and at the input of the filter to keep tabs. The carb is back on and all the linkage installed. Vacuum from there down to the distributor is all connected. I pulled the needle and cleaned that up a little. Documented the size in case I want to shop for something a little leaner. 6000 feet elevation tends to run kinda rich with the standers size. The exhaust pipe between the manifold and muffler is back on. I heat wrapped the pipe from the manifold to just before the muffler. Looks really cool. Might actually impact the under hood heat... might not. All the splash panage is back in place. Those were the hardest things to get back in. Fuel pump is in and sealed and all connected. No leaks that I can see... until it runs. What else? Generator back in place. Belt tight. I'm going to have to rewire everything eventually. I know I'm on borrowed time with that.
I replaced the mesh air cleaner with a conventional one. I found one almost perfect but just a hair taller. That made the lid screw just a bit too short so I replaced that. Works great now. Today I'll install the heater hoses then put the antifreeze back in. Go through the timing and dwell. It'll be so happy. The battery has been trickling all night. So "Gentlemen, start your engines". Cheers everyone
Good luck to you. You're hitting all the bases. It will run soon.
Well, I guess I was a little ambitious yesterday.
Got it all together. Started pouring in the coolant then I had to fiddle with the radiator hoses to stop them from leaking and that took some time. Finally cranked it over... nothin. Poured gas down the carb. Cranked it over... nothin. More gas... more nothin. Pulled a plug... dry. Confused. Pulled the valve cover off just to make sure everything was moving... it was. Pulled the coil-to-cap wire. Cleaned the connections real good. Checked for a good short. It was good. Pulled the cap and looked at the points to confirm open and close. That was good. It'd been a really long time since I'd troubleshoot an ignition system and it was dark by then so I put the trickle charger back on, made sure everything was turned off, locked up the garage and came home. I watched a YouTube last night on a typical voltage path of a points ignition system so I'm a little better armed and ready to hit it again this morning.
Note: if everything on this system isn't original, I'd be really surprised. Which means pulling everything apart and putting it all back together is bound to wake up every gremlin coming and going. With that in mind we'll see how today goes.
Pull a plug wire off of a plug and hold it against the terminal on the plug or other ground, crank the engine with the key on and verify you have spark. I'd recommend using insulated pliers to hold the wire as you crank.
7046 old site posts
Save a life, adopt a senior shelter pet
There are many good people. If you can't find one, be one.
1938 Master Business Coupe
1953 210 Sedan
Yep did that. Confirmed voltage all the way through to the point. Confirmed a good ground on the other side. Pulled the points and checked the contacts then just for good measure ran some sandpaper across. Decided to bypass the coil with a spare. Bypassed the whole switch end from the dash by connecting the pos side straight to the battery. Ran the neg side straight to the distributor. Used the existing coil-to-cap wire to make sure THAT was good. Had the plug out and against the head. Turned it over and walla got spark. Put the plug back in and cranked it again. It's ALIVE. Started right up.
So I let it run while I topped off the coolant. Made sure the lifters were getting oil. Watched the oil pressure at the bypass filter. All good. Let it warm up for awhile. Then the big test. Put the original coil back in and tried everything again. Lo and behold... it started right up. Not sure why but I won't complain.
Wanna see some pictures? I'll have to send them over from my phone but I'll get them downloaded here in a little while.
Until then, Merry Christmas everyone.
Cheers,
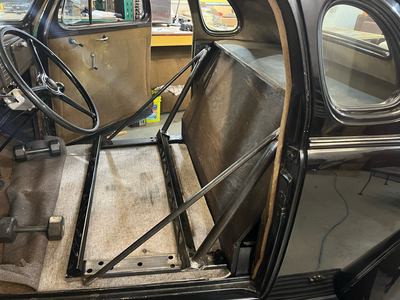
Quite a while back when I made the frame to mount my bucket seats I designed it in a way so to be able to mount a roll bar to it when I was ready. And to clarify, the bar was never intended to be an actual roll bar but more accurately, a bar to attach a shoulder harness for 3 point seat belts. So the time has finally come.
I deduced the angles of what the bar would need to be via the profile of the outside top. I knew I wanted the bar to set inside just forward of the back window and far enough up so to not block the rear view. So to get my first rough cut I used a light that I parked further toward the windshield to cast a shadow on a fiber board that I propped across and against the open trunk. Marked the shadow and cut it out just to have something to start with. Then I layed that across the roof just forward of the rear window and used a marker taped to a square to run a more exact curvature. Once that was cut out and tweaked a little I made an opposite (inside form) and then cut in the desired corner angles and exact distance across from side to side. I knew what my final width needed to be because I'd already made the seat frame bar perch accordingly. So then I just sat it up in place (inside the car) as the outside profile of the bar and wha-la it actually fit almost perfectly. I took that down to my local customs fab guys and they rolled and bent a 1.5" bar to perfection. More to come. It's late. I'll pick up tomorrow with a few pictures maybe.
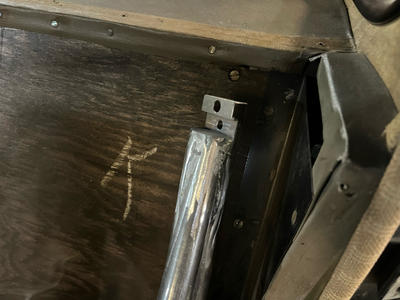
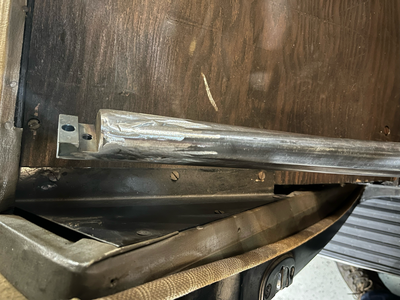
Once I got the upper part of the roll bar back from the fab guys I could then bolt that to the lower part that was already measured and cut (and the bar joints spot welded in) and then spot weld the whole shebang in place. Once all that was measured and tweaked and fit in place nicely, I had to remove the top bar assembly (because it wouldn't all come out in one piece. Hence the reason for the bar joint config). Then remove the whole thing so to fit the forward support bar on the bench. That meant I had to set the rack on the table and bolt both seats in place (on the table) then decide the bast way to mount the support bar and also make sure it clears the seats on the inside and the doors on the outside. The following pics should explain.
